MHXX GAN: Image Generation with Neural Networks
Intro
-
Working in preproduction and character concept art I noticed that a lot of the assets would not be used. The creative process takes a long time and meeting clients expectations can get complicated if there is more than one person making the decision.
-
The goal of this project was to see if generative adversarial networks could cut production time and costs as well as generate good base images for future character concepts or armor models.
-
I started with anime faces to learn about different types of GANs and then moved to my own dataset. The popular game Monster Hunter.
Can we create new art or armor design from a dataset we already have?
Computer Requirements vs Google Colab
-
To do a basic GAN or DCGAN with low dimensions doesn’t actually require a lot of computing power.
-
However, if you want to use Nvida’s Style GAN, Style GAN 2 or googles Big GAN you’ll need a dedicated GPU
- Below is what’s needed for computing requirements
- Nvidia gpu 11gb or greater
- Cuda 10.0
- cuDNN 7.6.5
- tensorRT 6
-
You could possibly use google colab, however training a style GAN requires converting the data to tfrecords. Which I will talk a little bit more later.
- I tried doing this multiple times however at the 12 hour mark my tfrecords would time out. I would only recommend using google colab if you are just using a vanilla GAN or deep convolutional GAN.
Vanilla GAN
-
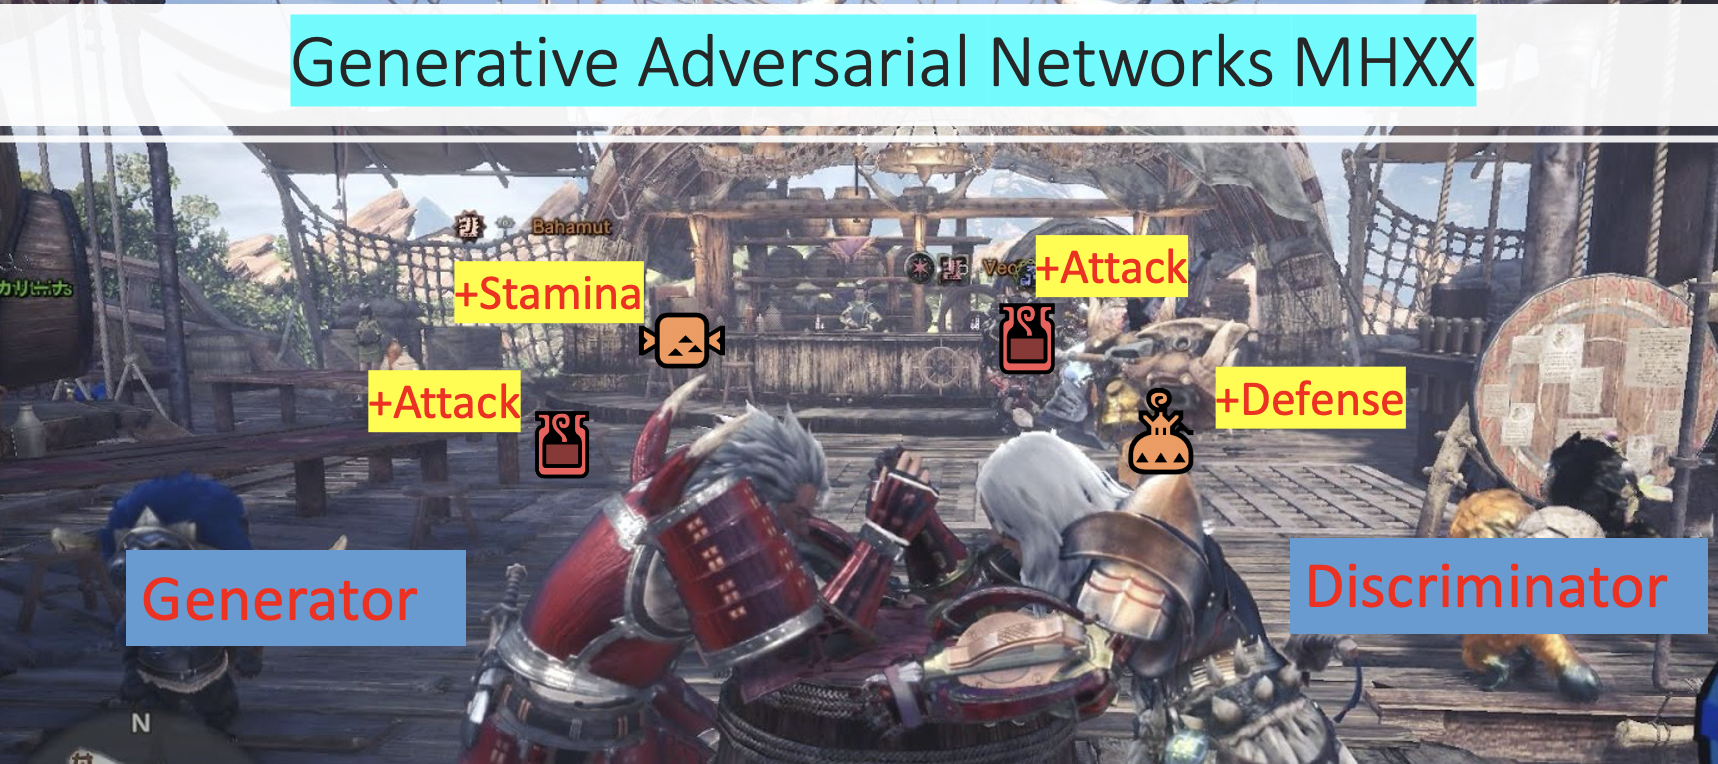
What exactly is a generative adversarial network you may ask. It is two neural networks that compete against each other.
-
One a generator who generates fake images think of this as the master forger who’s trying to generate fake art to sell onto the market.
-
Another is our valiant discriminator who is an inspector and looks through fake and real art and is able to hopefully choose the real thing.
-
Over time each of them trains and their weights get adjusted as one pauses and the other one learns. It gets to the point where the generator is generating pretty realistic copies of the real thing.
-
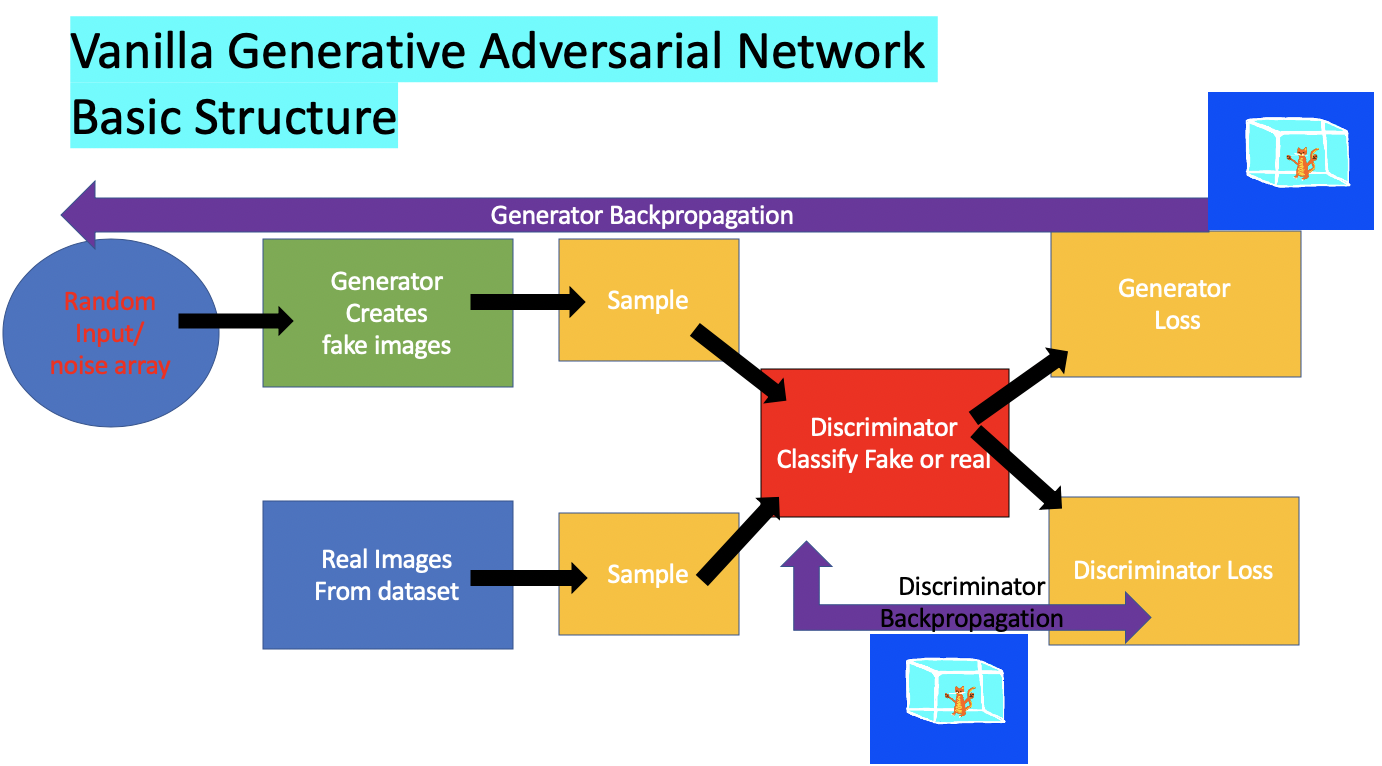
All this pausing and learning is done through backpropgation using gradient descent.
Backpropagation and Gradient Descent
-
What is backpropagation and what is gradient descent you might ask.
-
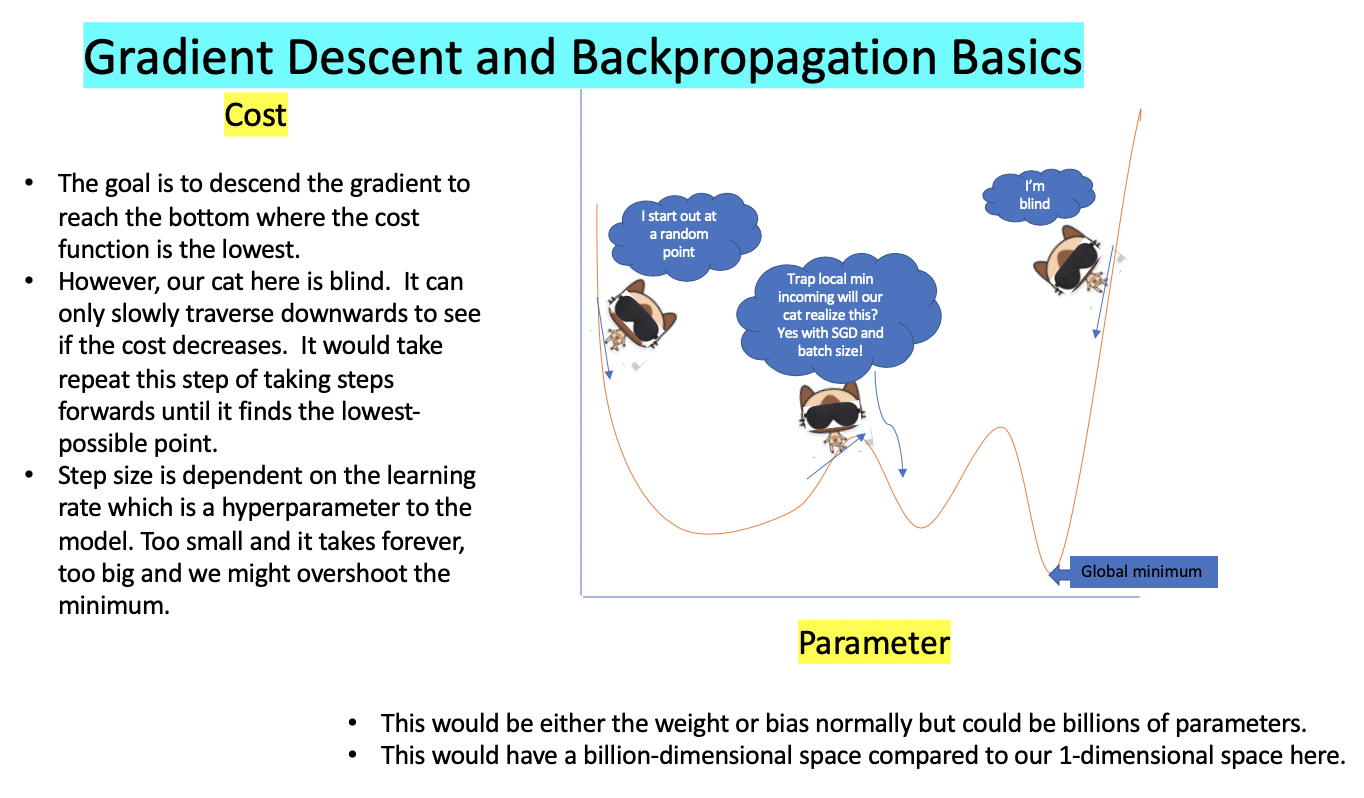
The combination of these two tries to minimize the cost function.
-
Learning is accomplished when adjusting the model’s parameters so that the estimated prediction gradually converges to the target and thus the cost would decrease.
-
At first the generator is frozen so the discriminator can learn. After a few steps it’s then the discriminators turn to be frozen while the generator learns.
-
To goal is for both loss in this case cross entropy loss to decrease, below we show an image of how gradient descent works.
Data Collection
-
I collected data from two different sources
-
One was the anime face dataset to learn how to use three methods of how GAN worked
-
This dataset contained 85000 images
-
The second was the Monster Hunter armor dataset
-
This dataset contained 1083 images which is not nearly enough to train with so data augmentation was used.
Image Augmentation
-
By using data augmentation I increased my dataset from 1083 to 19437
-
Step 1 was to separate top half, single and double images that were stuck together
-
I then split the double images in half
#Splitting Image in Half
s = []
for i in range(1081):
# Read the image
    img = imageio.imread(filenames[i])
    height, width, color = img.shape

# Cut the image in half
    width_cutoff = width // 2
    s1 = img[:, :width_cutoff]
    s2 = img[:, width_cutoff:]

    s.append(s1)
    s.append(s2)
-
The single images were then combined with cut in half double and the top half images were not used
-
To double or image dataset I mirrored the images
Mirror
#Flipping the images to get more data
flip_img = []
for i in range(2172):
    flip = np.fliplr(myarray[i])
    flip_img.append(flip)
-
To further increase it again I increased brighness and dimness of the images and took a random sample
-
I collected up to 19437 new data images
Brightness and Dimness
#Testing brightness and dimness to increase dataset

data = thre_array[1000]
# expand dimension to one sample
samples = expand_dims(data, 0)
# create image data augmentation generator
datagen = ImageDataGenerator(brightness_range=[0.7,1.2])
# prepare iterator
it = datagen.flow(samples, batch_size=1)
# generate samples and plot
plt.figure(figsize = (15,10))

for i in range(6):
	# define subplot
	plt.subplot(330 + 1 + i)
	# generate batch of images
	batch = it.next()
	# convert to unsigned integers for viewing
	image = batch[0].astype('uint8')
	# plot raw pixel data
	plt.imshow(image)
# show the figure
pyplot.show()
-
I then used photoshop to increase the resolution so we wouldn’t get any blurry images.
-
There are other methods of increasing the images dataset but I wanted to keep the same pose throughout
- Other methods include
- Random cropping of the image
- Taking a piece out of the image
- Changing the RGB color of the image
- Zooming in and out for the Images
- Flipping the image upside down
- Image slight rotation
- I then changed the images so they would have a 512 x 512 dimension which is required in Style GAN
#The files will be saved in a newly created folder called output
import Augmentor
p = Augmentor.Pipeline('mhxx_800px')
p.resize(probability = 1.0, width = 512, height = 512)
p.random_color(probability = 1.0, min_factor = 0.5, max_factor = 0.9)

#Now transform all our images to 256x256
from PIL import ImageFile
ImageFile.LOAD_TRUNCATED_IMAGES = True
p.process()
-
I then use fastai to check the images to see if tfrecords will read without error.
-
Use dataset_tool.py to change images to tfrecords
-
Please note when you do change your images to tfrecords you need to make sure you have enough space. Something like 6 gb of data can turn into 40-50 gb in tfrecords. This is because it takes the 4x4, 8x8, 16x16 all the way up to 1024 x 1024.
Convolutional Neural Networks
-
Convolutional layers can be thought as feature extractors) instead of connected layers for both discriminator and generator.
-
The main advantage of this is it would take much less training time.
-
For example, if you had an image with a resolution of 500 x 500 x 3 using a connected layer you would need up to 750,000 units for the whole image.
-
Then you would need to feed through each network layer. Imagine if you had 1000 neurons connected form the input to another layer. That would require 750,000 x 1000 which is 750 million connections. And you would keep going layer by layer and which would slow down training time as well as run the risk of overfitting.
-
Also, images nowadays have high resolution and to run it through a connected neural network would take ages.
-
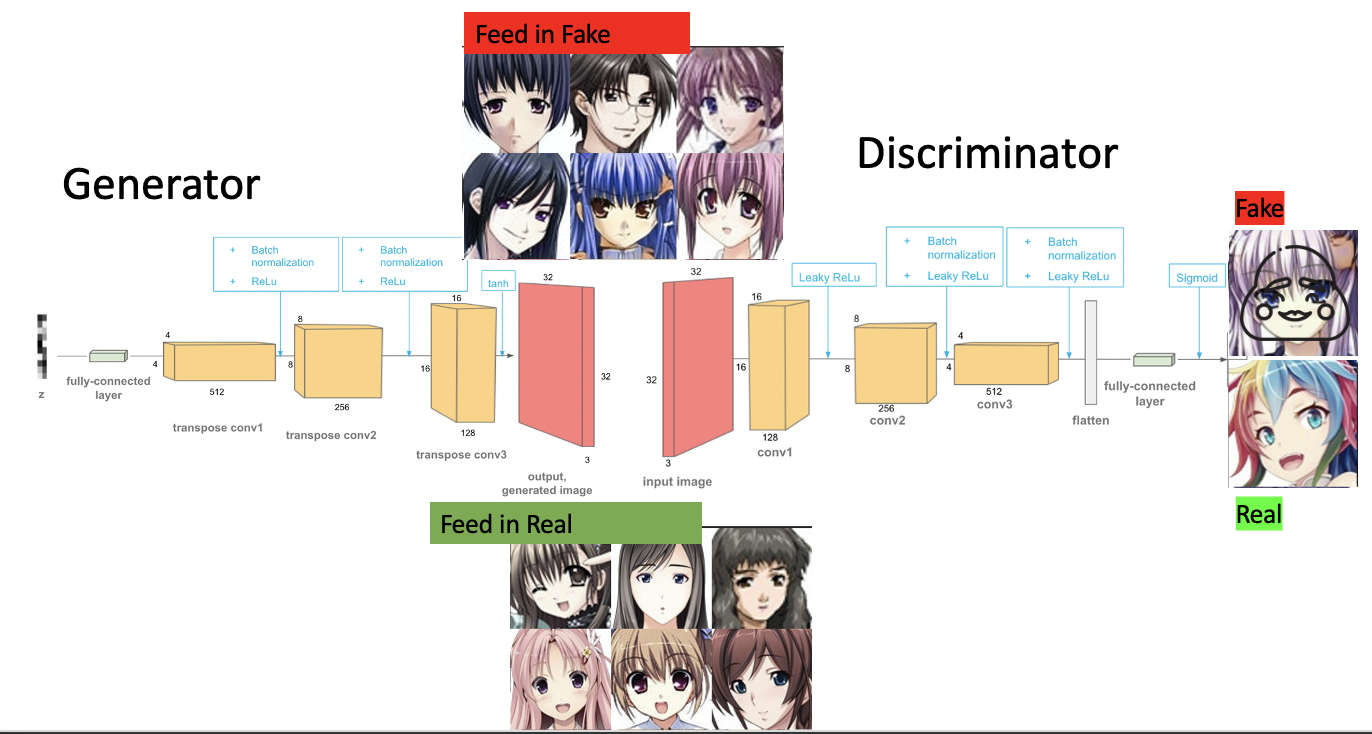
Below is the structure of a deep convolutional GAN (DCGAN) which we will be using later to explore how well our image dataset can be used to create new images
VGG16 Keras Model Feature Map
-
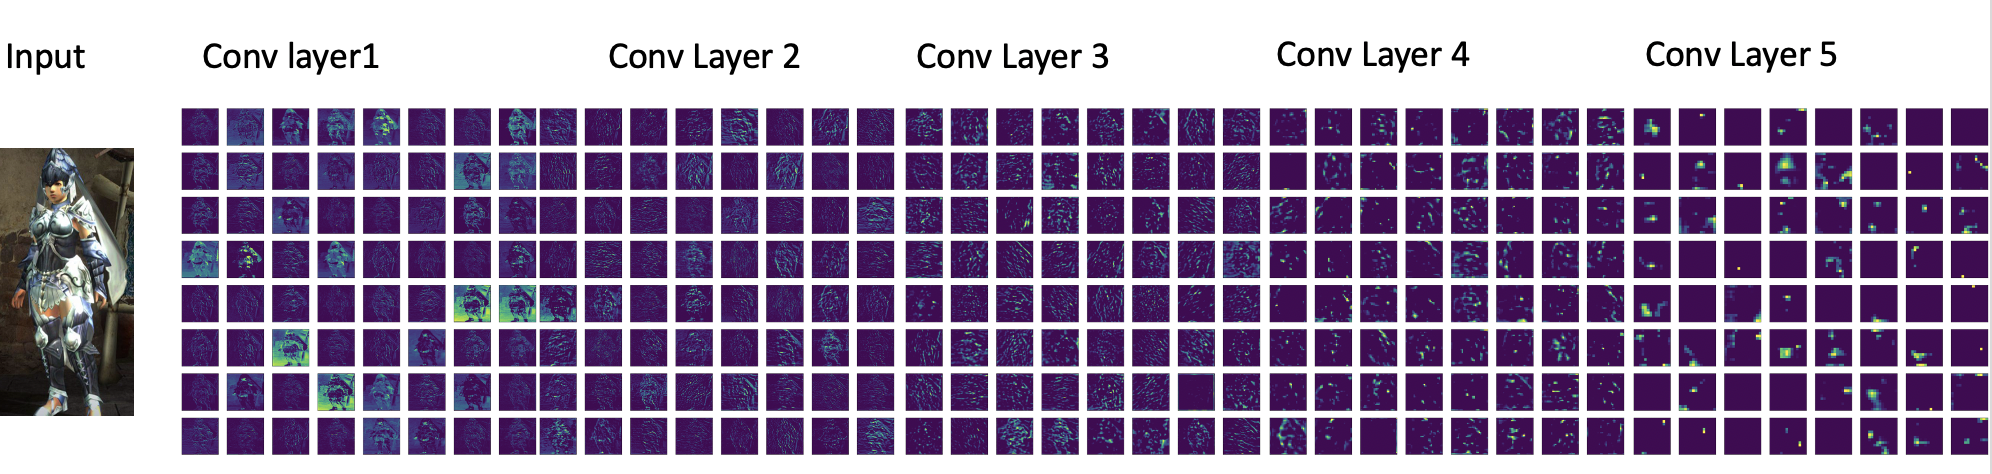
Another thing about convolutional neural networks is the feature maps capture the result of applying filters to an input image.
-
To try to gain an understanding of what features might be detected I used Keras’s VGG-16 model which is easier than trying to fit a model from scratch.
-
It has 16 learned layers and will show us how the neural network captures features. Filters are simply the weights in the neural network and these weight values have spatial relationship to each other.
-
Feature maps closer to the input capture more of the finer detail of the hunter armor avatar, as we progress through the network it becomes less and less clear.
Deep Convolutional GAN
-
The main reason why I chose a DCGAN was it didn’t require too much computing time and finding the results for the first 2000 steps of training took only about 1-2 hours
-
I explored 4 sets of data.
- Monster Hunter World armor top Half
- Monster Hutner Double Cross (MHXX)
- Anime faces
- Monster Hunter Palico companions
-
For hyperparameters I used generally the same as the original paper.
-
The Steps to train a DCGAN are the following:
- Sample a batch of normalized images from the dataset of real images
- Generate noise for input to the generator
- Generate images using random noise using the generator, I also saved the generated fake images every 200 steps
- We then train the discriminator by pausing the generator. It is fed in fake images and real images.
- Then we freeze the discriminator and have it learn using the noise and the real images.
- Repeat step using the for loop to end up with a good discriminator and generator. However at some point DCGAN can only improve the image so much.
- That’s where Style GAN will come in next.
Image Metrics
-
To see how well your GAN is you usually compare your fakes to your reals. You can also look at your generator loss, discriminator fake loss and discriminator real loss.
-
However, there are other quantitative measures that people have developed. Below are 3 of the most popular ones.
-
Inception Score takes the v3 model which was trained on 1000 classifications of images. This model is from the keras library. The higher the score the better. Which means better image quality and diversification.
-
Another method that borrows from inception score is frechet inception distance. It uses the same model but then compares the normal distribution between the real and fake images. The closer the distribution distances the better, which means the lower the score better image quality and diversification.
-
I got a score about 7.314 with the anime face dataset feeding it in the style GAN fakes comparing it to the real ones.
-
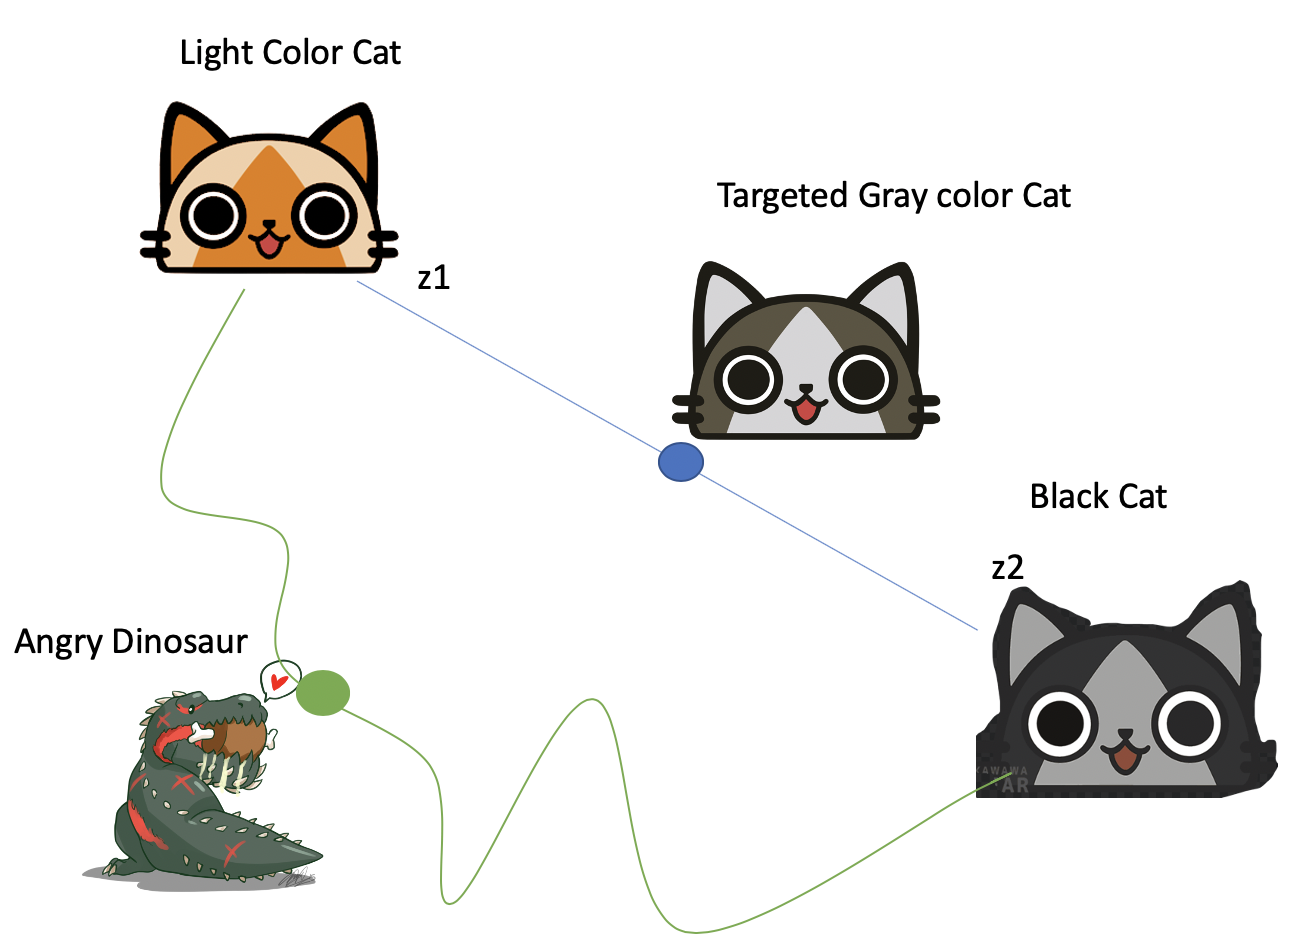
Another method that was developed by Nvidia is perceptual path length. They found that even with low FID scores, the generator would still produce low quality images.
-
The idea here is to choose the “perceptually” shortest distance.
-
For example, using a latent variable z1 produces a brownish light colored palico cat and a latent variable z2 produces a black palico cat.
-
Since only color is being changed the ideal path is the blue line where the middle ground is a gray palico cat which is “perceptually” the shortest distance.
-
The longest distance “perceptually” is the dinosaur as it needs to change shape and color
-
The lower the PPL the better.
Freceht Inception Distance Github
Style GAN
-
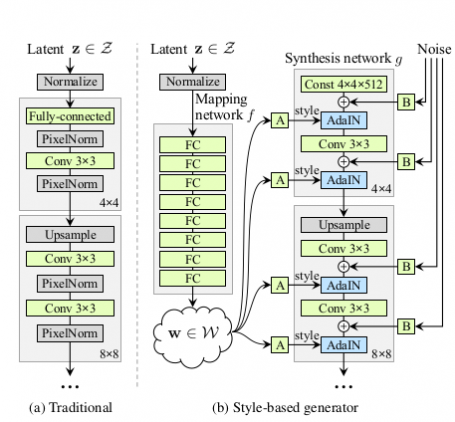
Use (A Traditional) Progressive Growing to gradually increase the resolution.
-
Generate images from fixed value tensor, not generating images from stochastically generated latent variables as in conventional GANs.
-
StyleGAN generates image from fixed 4x4x512 tensor
-
And stochastic latent variables are used as style vectors in StyleGAN.
-
The stochastically generated latent variables are used as style vectors through Adaptive instance normalization at each resolution after nonlinearly transformed by an 8-layer neural network.
-
Below is the process of training a Style GAN using the mhxx dataset
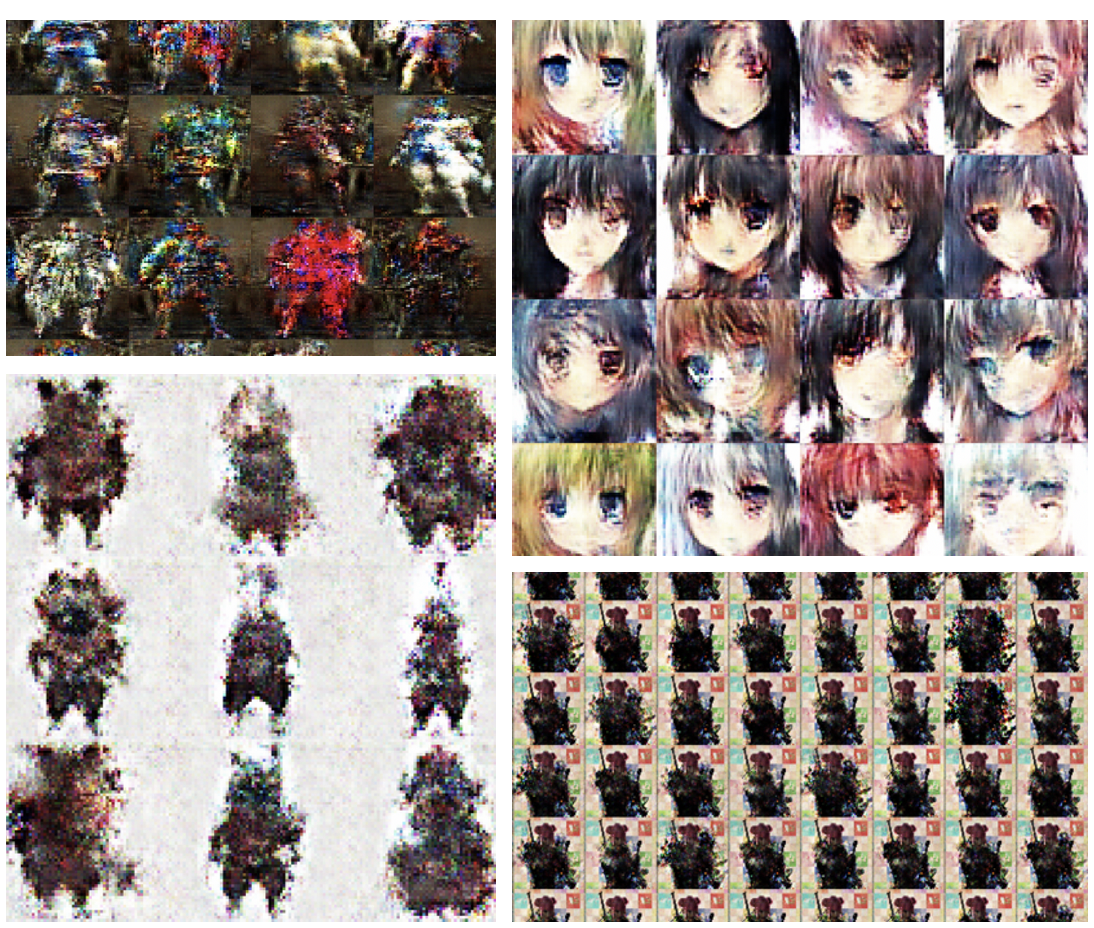
- For the anime dataset I trained it for 7 days. Using the original learning rate and minibatch. Below are the results using interpolation.
- I tried to do the same for the MHXX dataset however when we got to the fourth day of training we had a mode collapse.
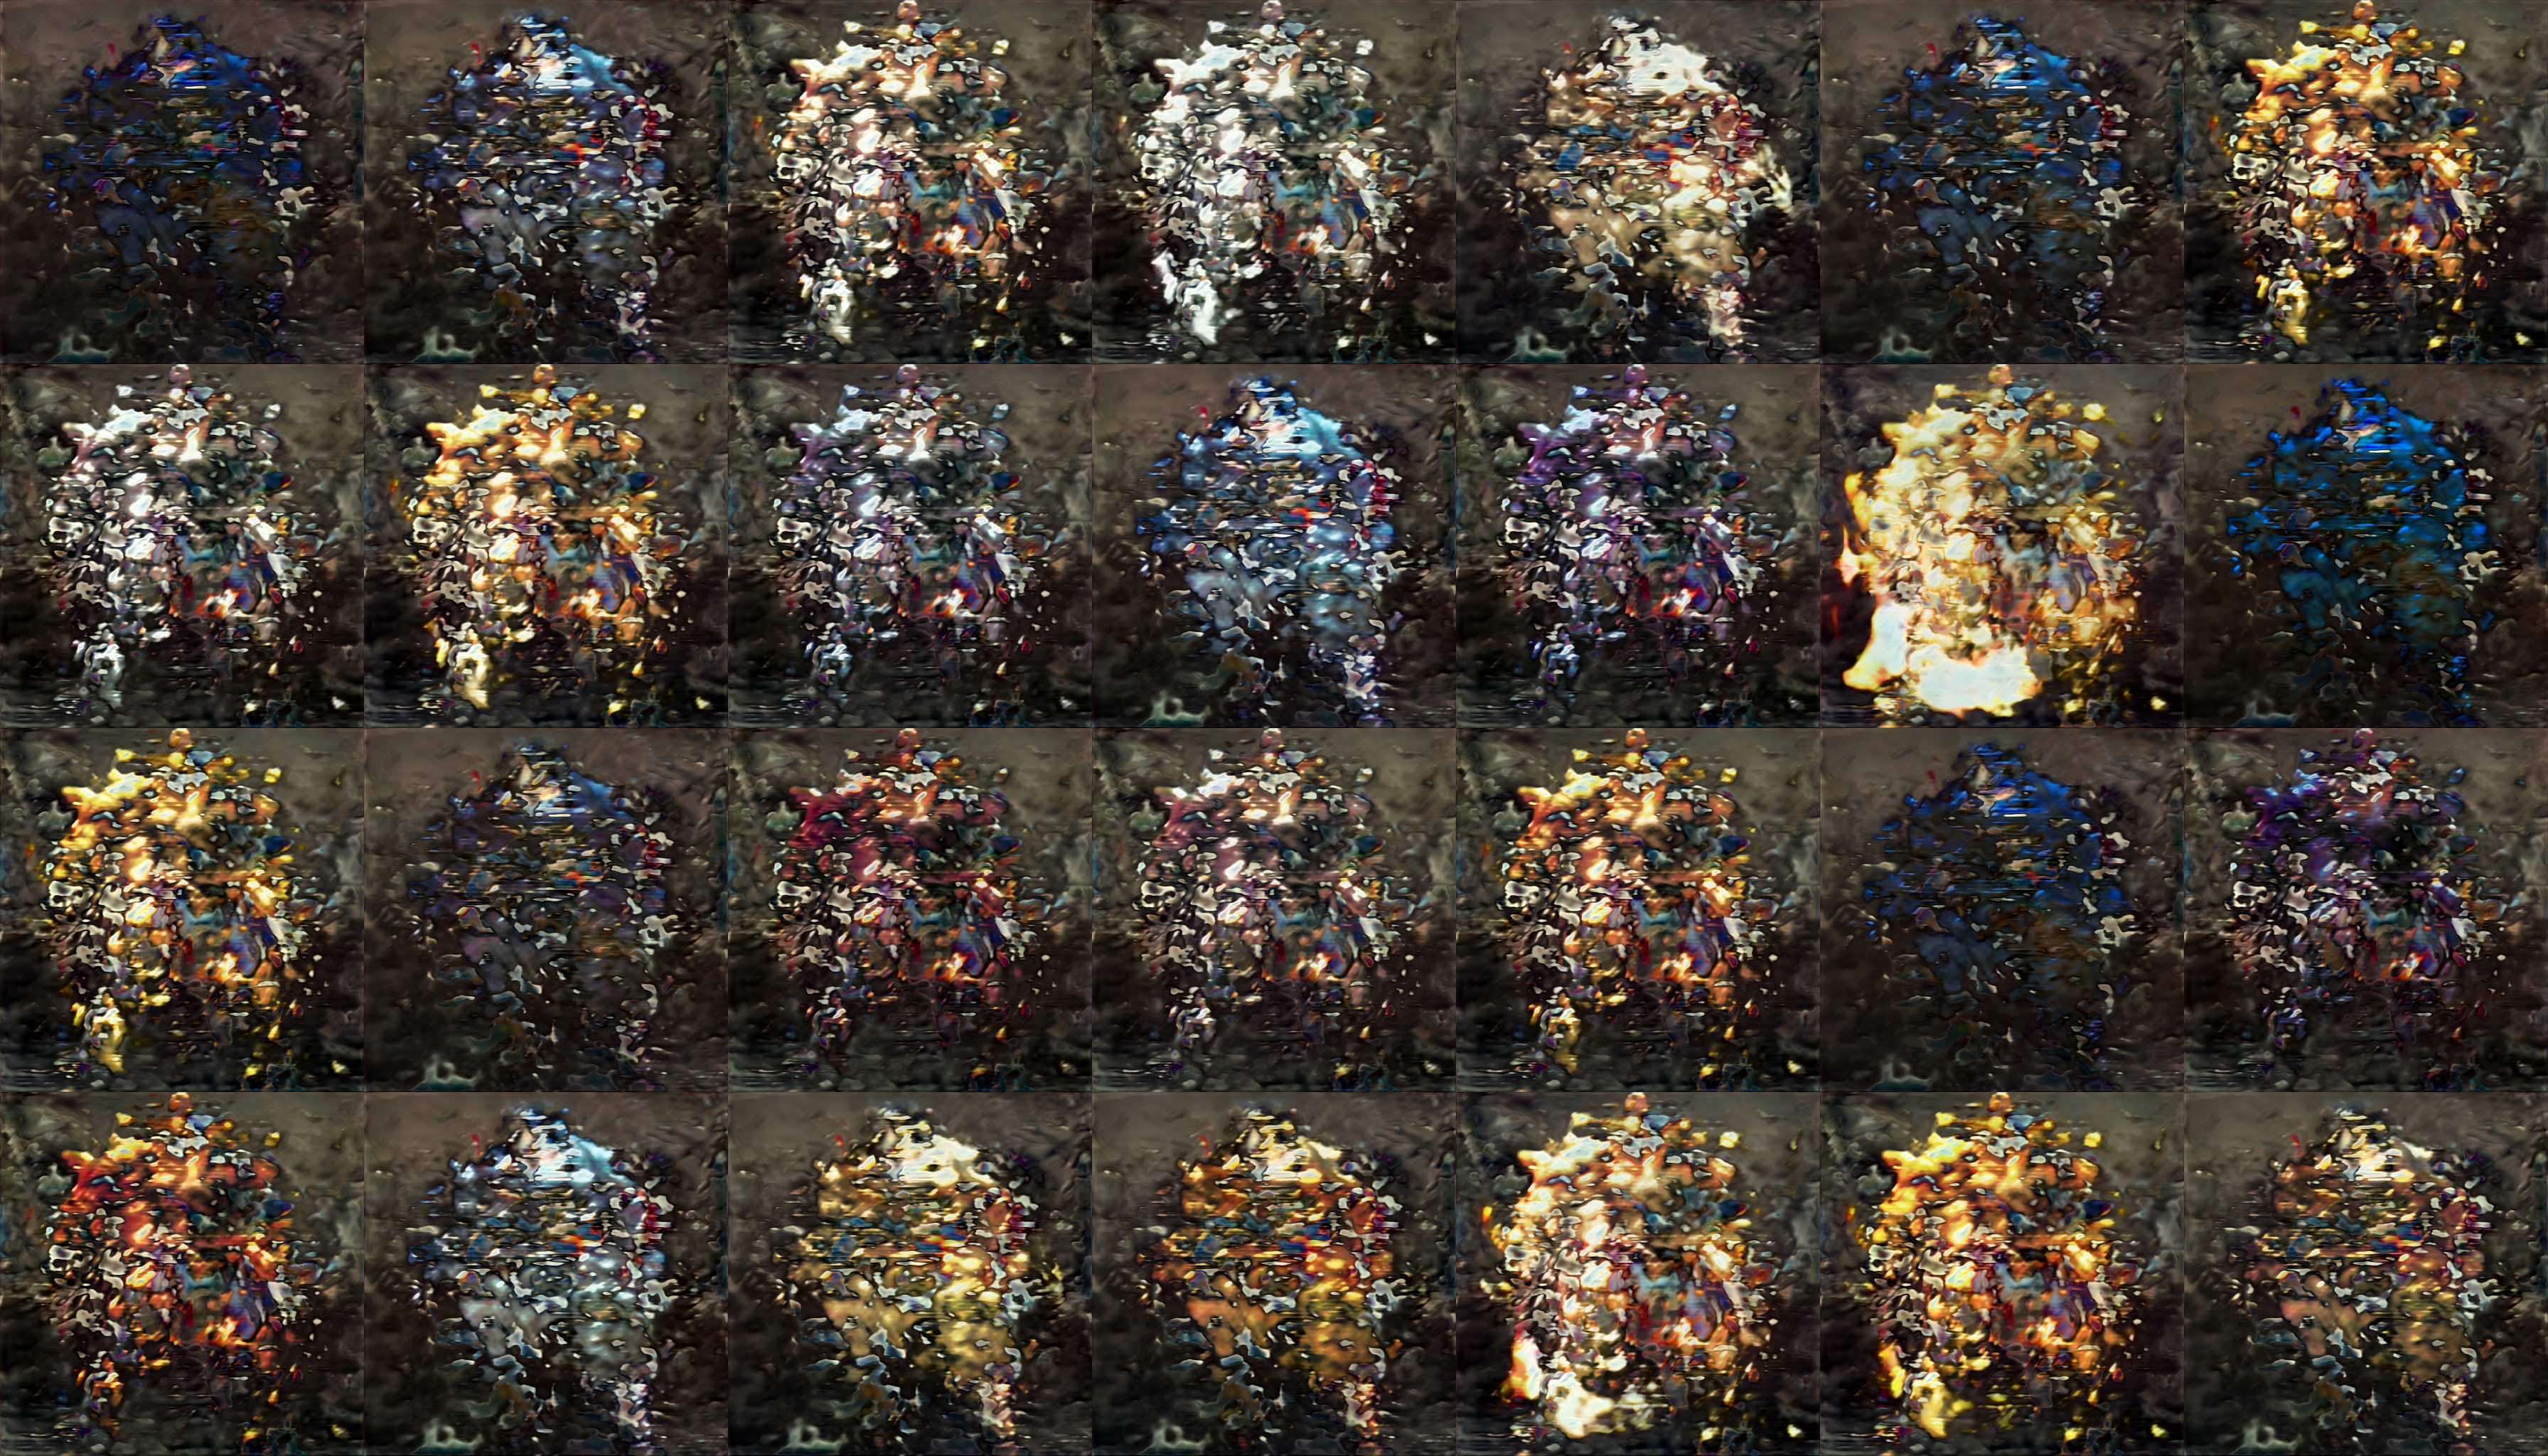
- What is mode collapse
- Mode collapse when generator only capable of generating one or a small subset of different outcomes, or modes.
- Like our exploding blurred armor on the right at 4 days of training
- Possible reasons for mode collapse
- Not enough data vs our face dataset. Only 19437 we might be overfitting the data with augmentation
- Generator has collapsed to a single point believing what it is drawing is real, then discriminator learns from that single point and gradient descent unable to separate identical outputs
-
I then used transfer learning from the anime face model pickle
- Hyperparameter changes
- decreased LR to 0.001
- set minibatch repeat to 1 instead of 5.
- Perhaps having too many minibatches to give to discriminator caused the model to be unstable
- Transfer Learning take a model trained on a large dataset and transfer its knowledge to a smaller dataset.
- Set resume_kimg to the pickled face model at 7440
- This allows us to use the advantage that the anime face model had a bigger data set
- Below are the results. We can see some blurred images and this called artifact or blurs. This is caused when the generator is trying its best to “feel” out how best to generate real images.
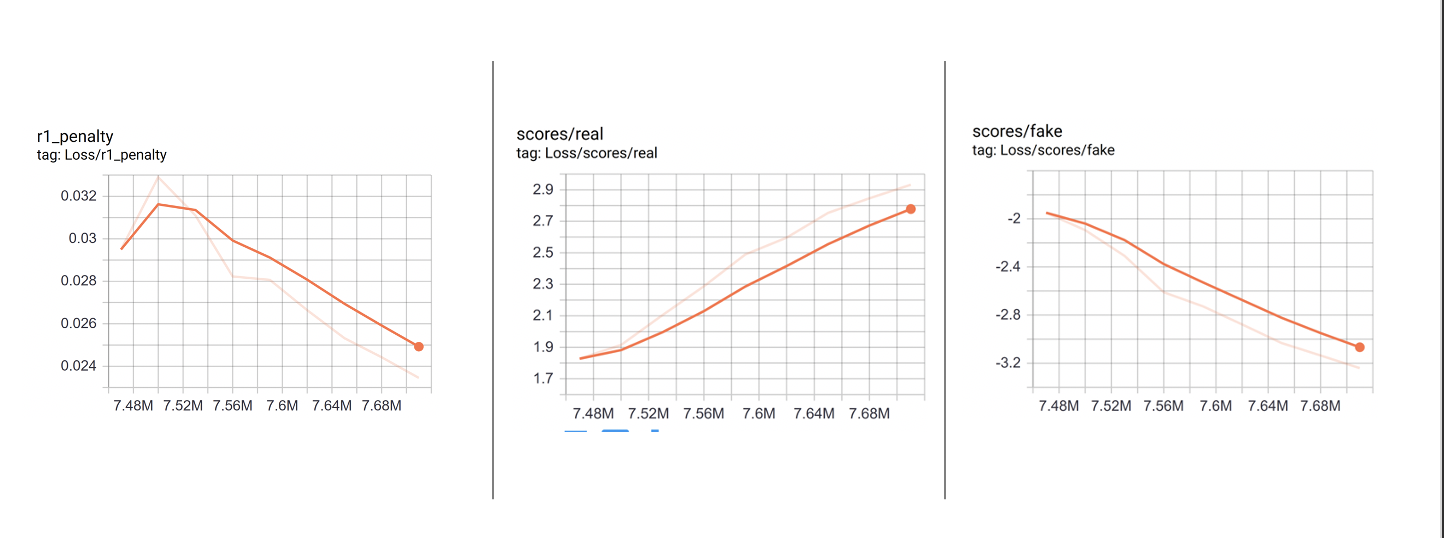
TensorBoard Generator and Discriminator Loss
-
r1_penalty-Generator loss is going down so producing better images
-
Fake_score- Discriminator Fake Loss – Getting better at classifying fake images
-
Real_score – Discriminator Real Loss – Getting higher and is getting worse at classifying real images Might be due to data size or artifact blurring
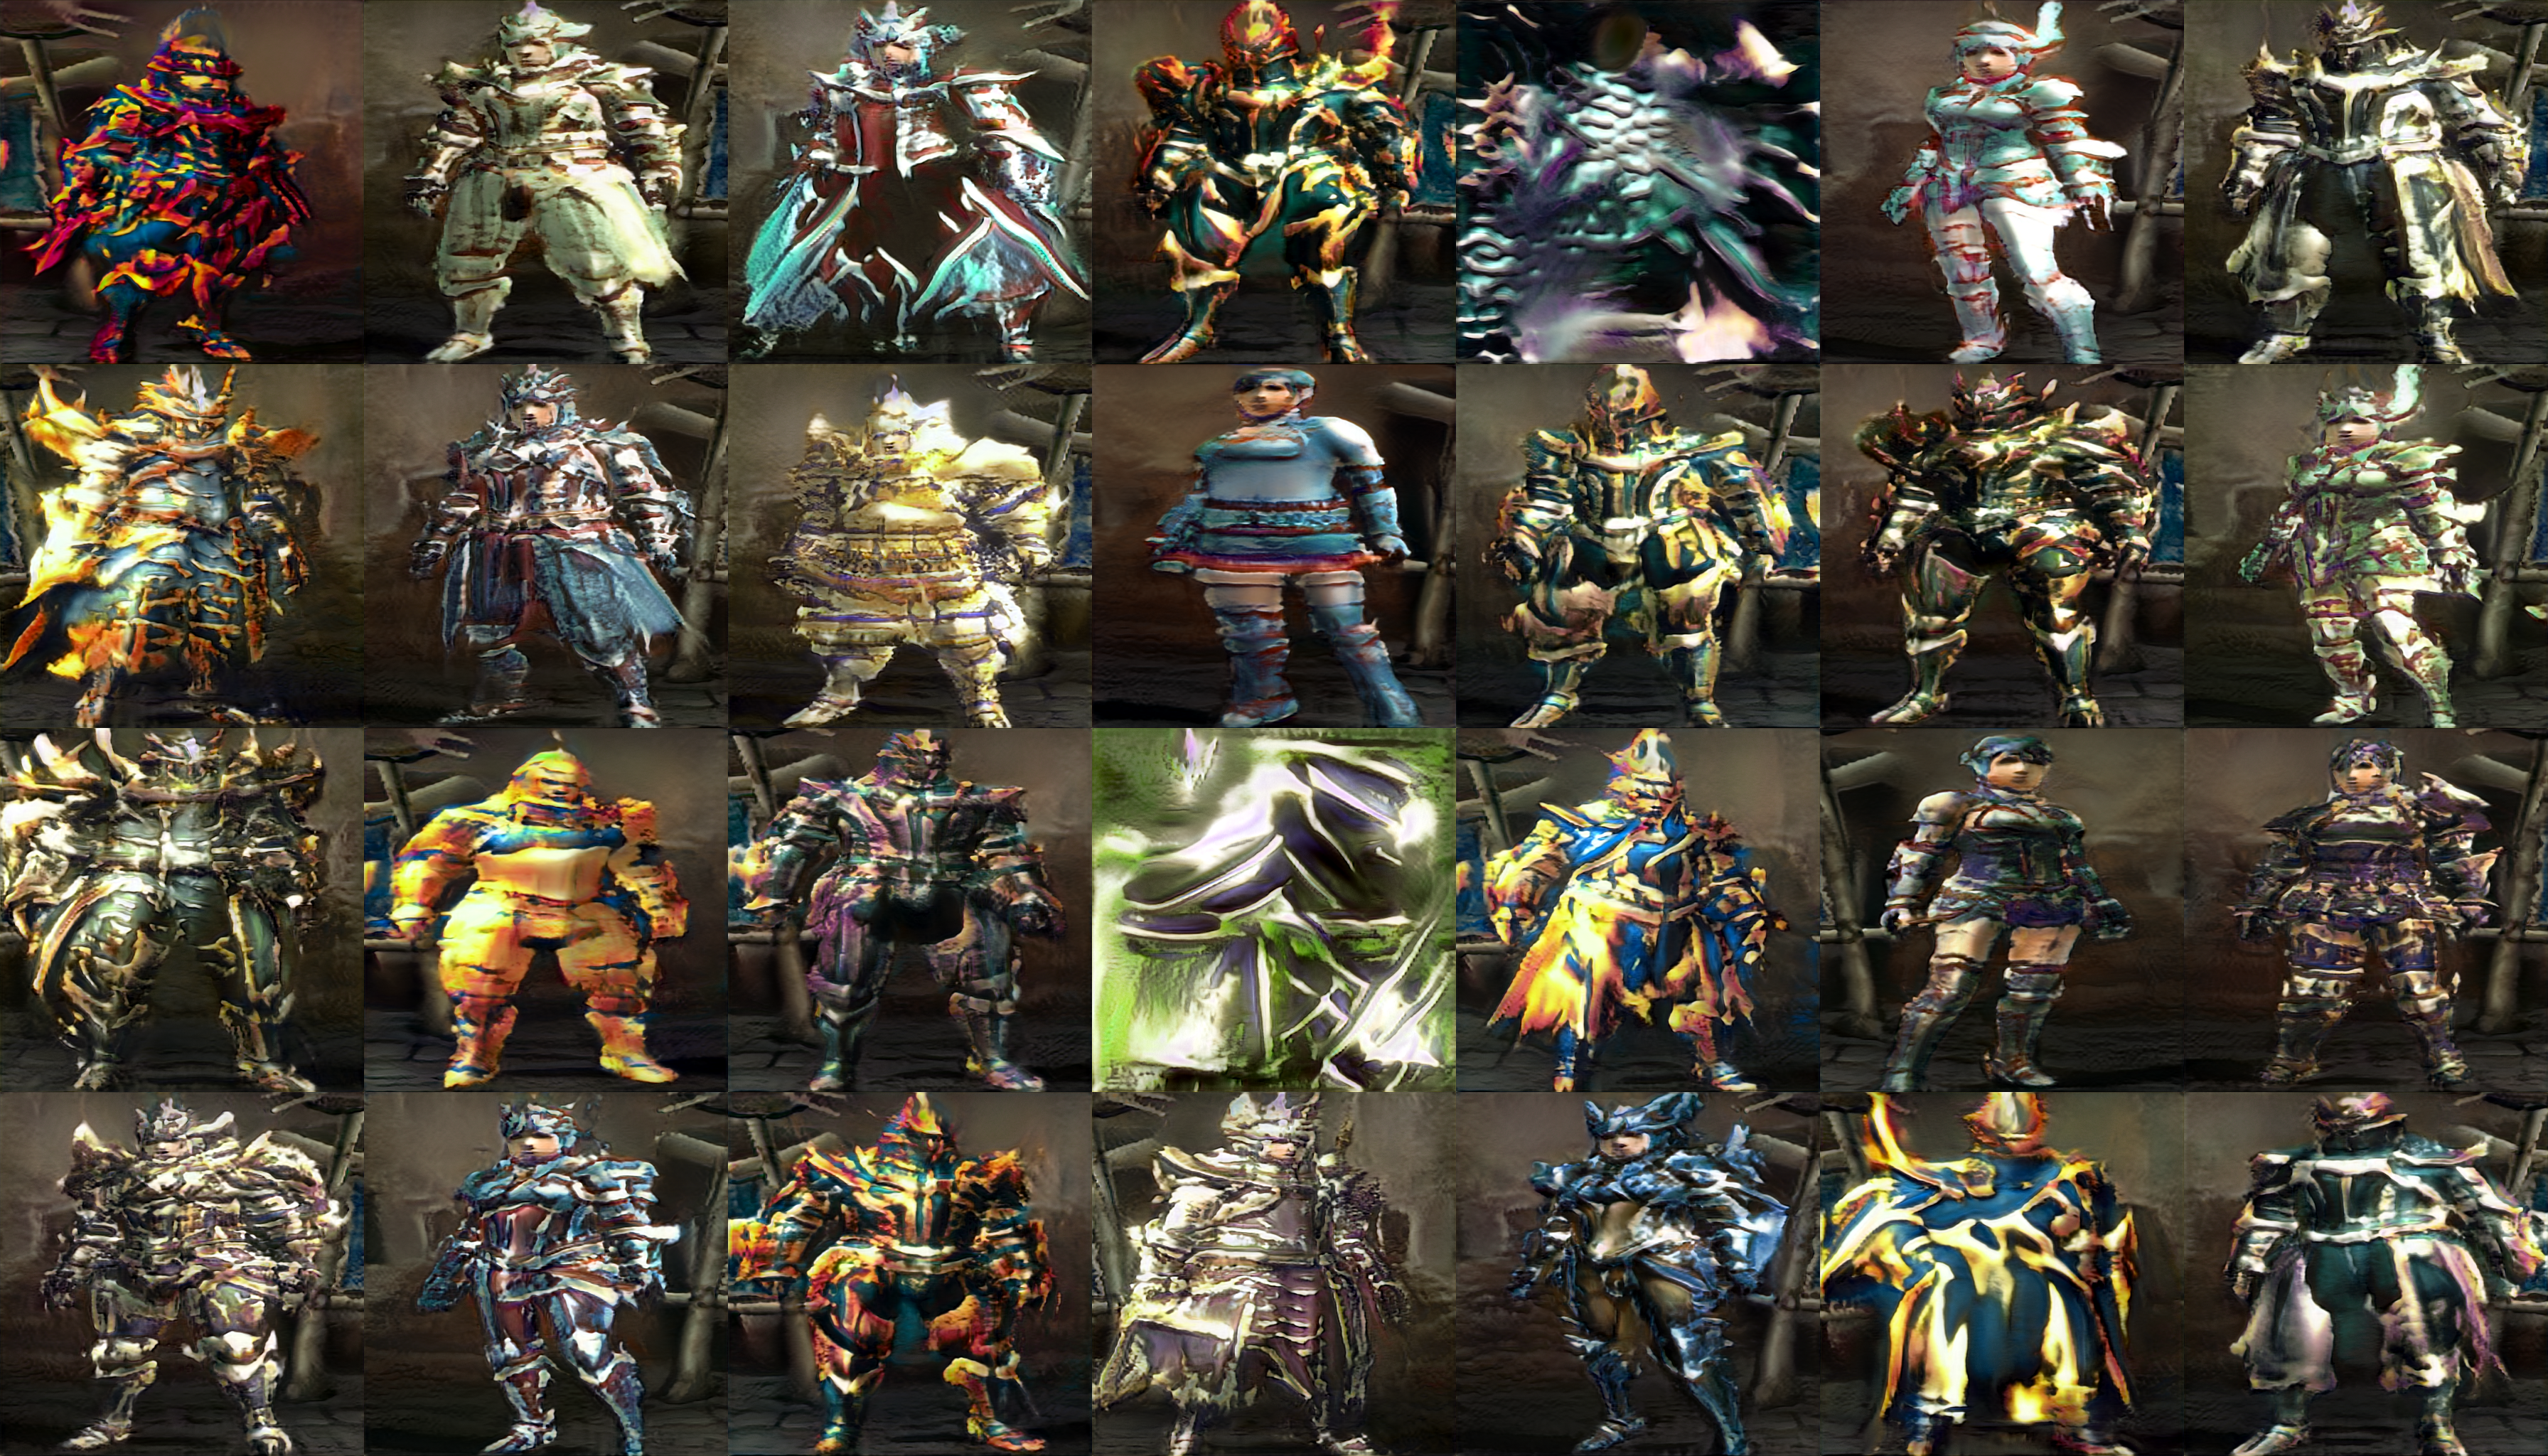
Generated Images
- This is the results of our generated images from the MHXX Style GAN
Future Work
-
This was pretty successful. The generate images could be used for new armor ideas for new monsters or new armor designs.
-
To better improve this I would probably collect more images from mixed armor fashion communities and more armor data from monster hunter world.
- Some ideas to add to this are:
- add a gpt2 model to it to generate hunter and armor names
- separate with helmet and no helmet and male and female so model can do a better job.
-
Future work could be to generate new iron man armor, a new Disney princess
- Going to try to work on a face swap GAN web app using existing IP for social media.
Thank you for reading my Blog! Slide Deck, Full Write up and Github link below